Why you should not use JWT for authentication

A
Software Engineer | Mentor | Cats | Food | Loves to learn
Search for a command to run...
Software Engineer | Mentor | Cats | Food | Loves to learn
No comments yet. Be the first to comment.
Simple bite-sized explanations with practial examples (Naming, Code Formatting and Functions)

In modern DevOps, Docker is considered the most popular set of services for application containerization. In this article, we will NOT be covering a Docker tutorial, because a lot of good tutorials are already available on the internet. Instead, we w...

Howdy folks? It's been a long time since I wrote an article. Today, I'm restarting with this which will aid beginners to learn what Microservice architecture is, how it works and its pros and cons. After that, we will design a mock Tinder applicatio...

Do you love to watch movies? Do you love to watch tv and web series? Then, ScreenView is for you. When the Auth0 hackathon was announced, I along with my friend decided to build a platform for what we love most which led to ScreenView. Before getting...

JWT (JSON Web Token) is a well-known and simple method of authenticating a user. Almost all tutorials you did on the backend, specially API building tutorials probably told you to use JWT. I also thought once that JWT is the modern and better authentication method. Of course, it was a lack of my knowledge. This article tries to shed some light on this and show you some other alternatives of JWT, which can be better suited depending on your needs
JWT (JSON Web Token) is a stateless token containing user information, signed using public-private cryptography. As such, an intruder cannot modify the token information, because that would also change the signature.
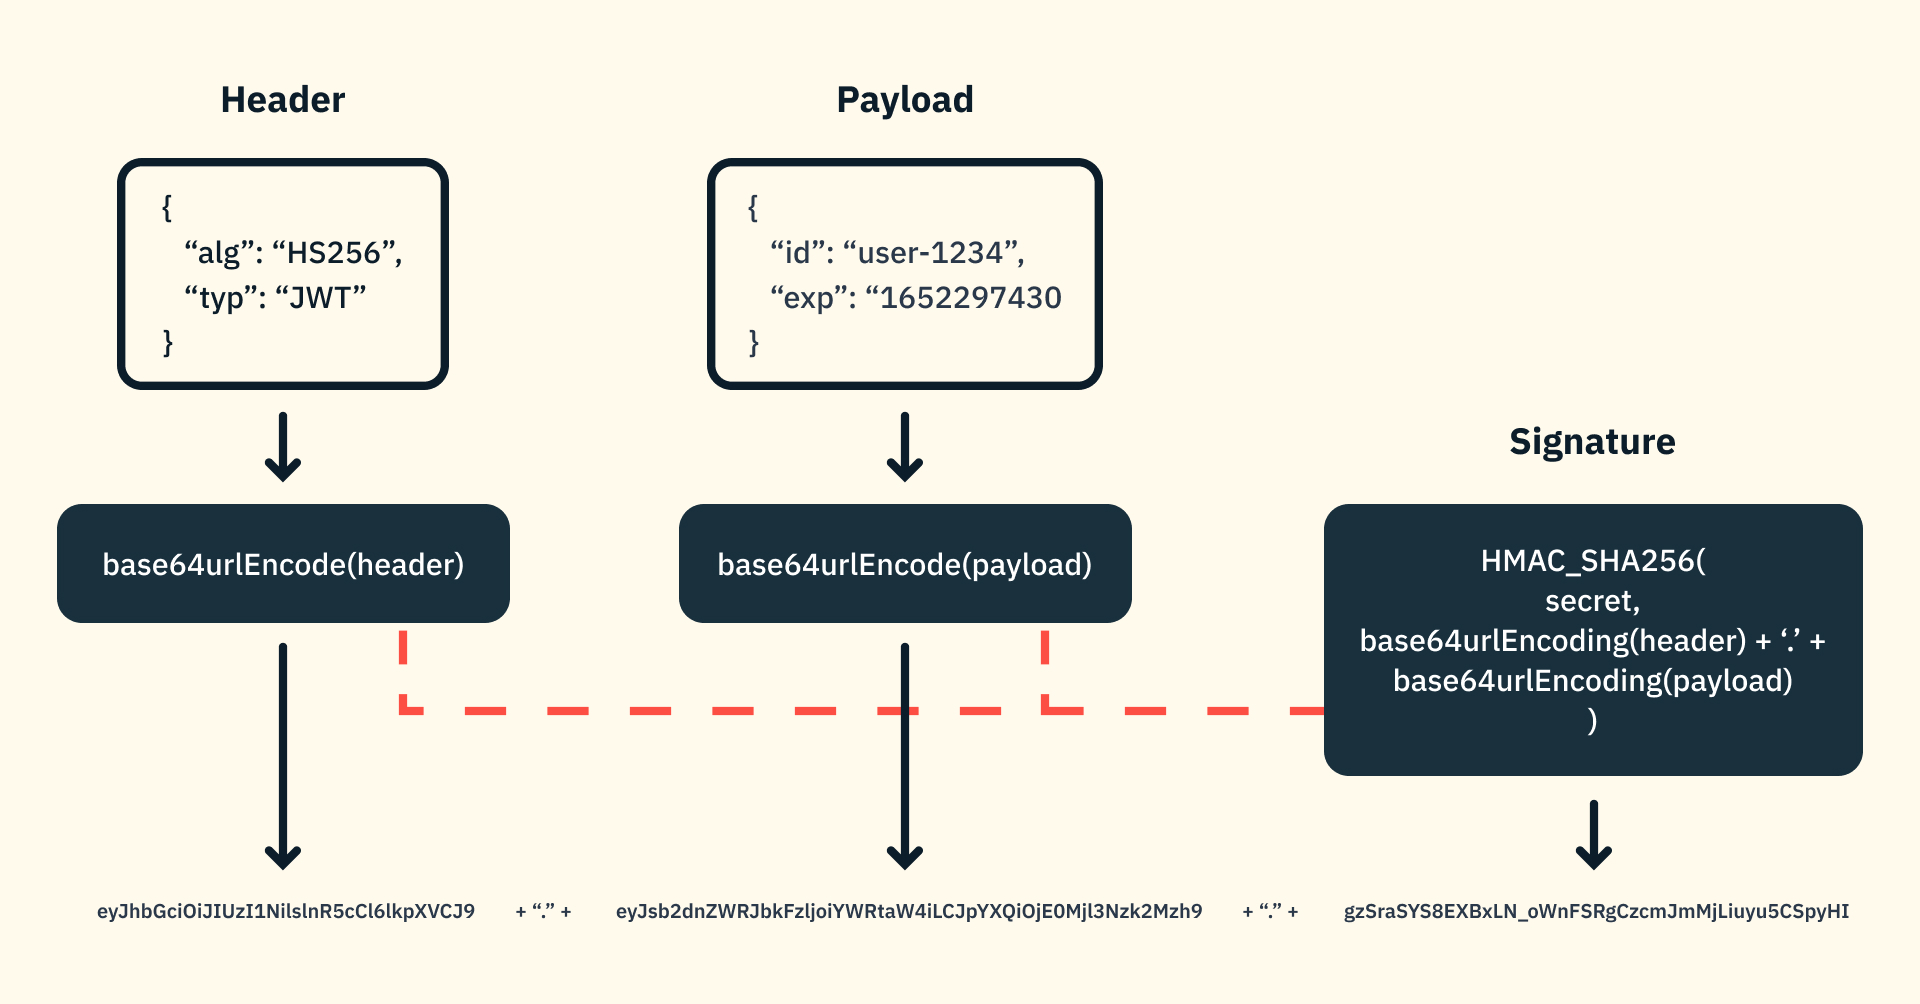
A JWT token looks like this
eyJhbGciOiJIUzI1NiIsInR5cCI6IkpXVCJ9.eyJzdWIiOiIxMjM0NTY3ODkwIiwibmFtZSI6IkpvaG4gRG9lIiwiaWF0IjoxNTE2MjM5MDIyfQ.SflKxwRJSMeKKF2QT4fwpMeJf36POk6yJV_adQssw5c
This example is taken from jwt.io. You will find the decoded version if you visit the page. It contains sub (user identification), name and iat (issuing time). Instead of iat, exp (expiry time) is also used.
This image can help you understand the breakdown
Stateless: It is stateless. So no data needs to be persisted to authenticate any user
Self-contained data: You don't need any other source of truth to verify your user. Claims allow you to add extra data params, like if the user is admin.
Client-controlled logout
With JWT, the biggest problem is there are no reliable ways to log out users. The logout is fully controlled by the client, the server side can do nothing about it. It can just expect the client will forget about the token, that's it. This is dangerous from a security perspective.
You can, of course, use short-lived tokens and use refresh tokens to fetch new JWT tokens. Let's say, your token expiration time is 2 mins. Now, you have to handle the complexity of using refresh tokens and generating new tokens every 2 minutes. This will be a big overhead in your front end. It will also cost your servers if your application grows large. Above all, you still don't have full control if you want to unauthenticate a user.
Blacklisting user sessions
Maybe some logins got marked as unauthorized by the user, maybe the login was suspicious, or the device is lost or not used anymore. In that case, you would want to blacklist that token. To do this, you would actually have to store those blacklisted tokens in a persistent database and check through them each time a user needs authorized access. This can be an overhead. Besides, storing blacklisted tokens is equivalent to maintaining state on the server, which somewhat defeats the purpose of JWT.
Manually adding it to requests
You have to add the JWT in each of your request headers manually or have some config in place to do that for you.
Storage security
Many devs use localStorage to store session tokens, which can be easily exploited through JavaScript XSS (Cross-site scripting) attacks. You can, however, store the token in secure cookies. But that would solve only one problem
So, what is the solution?
Session cookies are underrated. They are old but gold.
This is how it works: when a user logs in with the correct credentials, the server creates a random bearer token representing the session and sends the session back as a cookie.
| user_id | session_token | expiry |
| 2 | 47a0479900504cb3ab4a1f626d174d2d | 1516239022 |
| 2 | 0050479900504cb3ab4a1f626d171f62 | 1516239822 |
| 5 | 0504cb39900504cb3ab4a1f626d171f6 | 1556239822 |
The user id 2 is logged in with two different devices, thus two sessions. The session_token, which is random and unpredictable, will be sent as cookies.
Does managing it seem complex? Not really. Popular web frameworks have some abstraction in place to handle cookie-based sessions. In this article, we will see how we can use Flask to handle session cookies.
Server-controlled logout
Whenever a user needs to log out, the server can just delete the session entry, and that's it. The user gets logged out immediately, totally controlled by the server. This is a more reliable solution compared to JWT.
Blacklisting
This is also easy. Why keep a list of blacklisted sessions when you can just delete them? If a user marks his device as lost, you can delete all the sessions of that user, forcing him to log in again with his credentials.
Auto-attachment
With how cookies work in general, you don't have to add the cookie with each of the request headers. Once the web browser receives a cookie, it will send the cookie automatically with each of the subsequent requests. These cookies are secure and cannot be accessed or modified using JavaScript.
Increased database read/write
Sessions are persisted in DB. This might result in a slightly increased load on scaling. But in real-world systems, Redis is used to store user sessions, which solves this issue.
CSRF Attack
If not taken preventive measures, session cookies are vulnerable to Cross-site request forgery. To solve this issue in a dynamic website, CSRF tokens can be used. As for REST APIs, CORS (Cross-origin resource sharing) can be configured properly to prevent unwanted requests.
I will demonstrate a simple example with Flask to use session cookies. We will use Flask-Login, which will manage the session cookies for us.
First, we will create a User model and some mock database methods
# user.py

from flask_login import UserMixin

class User(UserMixin):
  def __init__(self, id: int, name: str, email: str, password: str):
    self.id = id
    self.name = name
    self.email = email
    self.password = password # in a real application, password would be hashed

  def get_id(self):
    # required by flask_login
    return str(self.id)


# Mock DB
u1 = User(1, 'TestUser', 'test@email.com', 'weakpassword')
u2 = User(2, 'SecondUser', 'rest@email.com', 'pass2')
users = [u1, u2]

def get_user(id):
  for user in users:
    if user.id == id:
      return user
  return None
The UserMixin model implements some methods that are required by Flask-Login. This get_user will act as a fake database method.
Next, we need to instantiate LoginManager() . We will use a separate file for this:
# login_manager.py

from flask_login import LoginManager
from user import get_user

login_manager = LoginManager()


@login_manager.user_loader
def load_user(user_id):
  # in a real application, you would fetch the user from DB
  _id = int(user_id)
  return get_user(_id)


@login_manager.unauthorized_handler
def unauthorized():
  return {'message': 'Unauthorized'}, 401
The load_user method will be used by Flask-Login to reload a user. How the user is returned is totally up to you. In our case, we will be returning the user from our mock DB. In a real application, you would fetch the user using your ORM (SQLAlchemy, in most cases).
Finally, the main.py file will be used to include the routes and start the server.
# main.py

from flask import Flask, request
from flask_login import login_user, logout_user, login_required, current_user
from user import get_user
from login_manager import login_manager

app = Flask(__name__)
app.config['SECRET_KEY'] = 'some-nice-secret-key'

login_manager.init_app(app)


@app.route('/heartbeat', methods=['GET'])
def heartbeat():
  return {'status': 'OK'}


@app.route('/login', methods=['POST'])
def login():
  data = request.get_json()
  user = get_user(data['user_id'])

  if not user:
    return {'message': 'User not found'}, 400

  if user.email == data['email'] and user.password == data['password']:
    login_user(user)
  else:
    return {'message': 'Invalid credentials'}, 400

  return {'message': 'User logged in'}


@app.route('/logout', methods=['POST'])
@login_required
def logout():
  logout_user()
  return {'message': 'Logged out'}


@app.route('/profile/<user_id>', methods=['GET'])
@login_required
def profile(user_id):
  user = get_user(int(user_id))

  if not user or current_user.id != user.id:
    return login_manager.unauthorized()

  return {'name': user.name, 'email': user.email}


app.run(host='0.0.0.0', port=81)
The login and logout methods are self-explanatory. Notice that the logout method doesn't take any kind of user-identifying param. Just calling logout_user will automatically fetch the session cookie attached to the request, and log the user out.
To access certain profile data, you have to be logged in as that user.
That's it! The full code can be accessed and run from this Repl (Click Show Files to see the code).
Don't get me wrong, JWT is a solid solution, but it works best in certain scenarios, not all. In a gateway backend (backend directly communicating with web client), JWT complicates things. Besides server implementation, you have to maintain a whole lot of logic in the front end. On the other hand, cookies make everything simpler.
Although JWT might not always be the solution for your web API authentications, it definitely has some use of its own. It's a great way to gain temporary access to protected 3rd party resources. Or in another terms, JWT is best suited when communicating API to API.
Suppose, you use Spotify. Now, for the sake of this example, let's say a song is stored in AWS S3 and the access URL looks like this
https://s3.spotify.com/music/example-music.mp3?token=eyJhbGciOiJIUzI1NiIsInR5cCI6IkpXVCJ9.eyJzdWIiOiIxMjM0NTY3ODkwIiwibmFtZSI6IkpvaG4gRG9lIiwiaWF0IjoxNTE2MjM5MDIyfQ.SflKxwRJSMeKKF2QT4fwpMeJf36POk6yJV_adQssw5c
Notice the token param with the query. The token param has a JWT, which verifies that you're an authenticated user of Spotify and can access the music file for the next X minutes. Usually, file access is not directly related to your Web API in this case, so, a stateless token can be super useful to give privileged access to files.
The following diagram can help you understand this

In the above example, Gateway API uses session cookies, and the related services are under a private network. But, S3 Access is separate from your business logic and thus it shouldn't know anything about your application. As such, a JWT token is the best approach to give controlled access to your S3 files (like the music files in Spotify in our example).
Thanks for reading this far. I hope this article clarified the concepts. If you liked it, please share it with your network. If you have any feedback or questions, drop them in the comments. Thanks again!